Search this blog

Monday 18 January 2010

Wallpapers >>>Awesome Wallpapers #2<<< Chosen by me... xD

iPhone version

Download - Resolutions:

Wallpapers >>>Awesome Wallpaper #1<<< Chosen by me... xD


Download - Resolutions:

3D Effect >>> Create a Realistic 3D Leaf

How to Create a 3D Leaf from a Texture Photograph

In this beginners level tutorial, you will learn how to create a vibrant 3D leaf compilation from a single 2D photograph. You will be able to manipulate the object however you prefer. Let's have fun with this display of greenery.

Final Image Preview

Take a look at the image we'll be creating. Want access to the full PSD files and downloadable copies of every tutorial, including this one? Join Psd Plus for just $9/month. You can view the final image preview below. You can view the large version here.

Video Tutorial

Video tutorial to compliment this text + image tutorial.

Step 1

To begin, you'll need to find a photograph texture of a leaf. I have chosen this one from lostandtaken.com by a a photographer named Caleb Kimbrough.

Step 2

Load your new found texture into a new project. With the Rectangular Marquee Tool (M) selected, Right-click on your layer in the artboard and select Free Transform. Once you have done that right-click on the texture again and select Warp. I have labeled each corner respectively as we will be moving them around quite a bit.

Step 3

Now that you have your layer in Warp mode, click and drag the corner (a) down 1/3 of your grid.

Step 4

Now click and drag the corner (point c) up 1/3 of your grid. Already our leaf is beginning to take on it's natural form.

Step 5

Each corner has 2 arms that you can move in order to manipulate your layer even further. Pull the corner's (point a) left arm down as shown below.

Step 6

You should give a sharper edge to your leaf. Something like this. Press Enter to finalize the Warp.

Step 7

You should have a sharp point on your leaf after the last several steps. However, your point may be a bit bent due to the Warp Tool curling. Fix this by using the Polygonal Laso Tool (L), selecting the excess curl and pressing the Delete key.

Step 8

Now lets focus on the other end of the leaf. Use the Warp Tool again (see Step 2) and drag point d as shown in the picture below. You'll want to get both of the arms of point d to be parallel.

Step 9

Now do the same with the top-right corner (point b). Also, if you want you can tweak the leaf into whatever position you require by holding your mouse down and dragging the inner grid, as well as the other points.

Step 10

To add a bit of additional perspective Right-click on your leaf and select Free Transform. Now hold Alt + Shift and drag the top-right corner, then move it left a bit. This will give the leaf a bit of distance perspective.

Step 11

If you want to make the leaf drop at its point, use the Rectangular Marquee Tool (M) and select only the left half of the leaf. Then proceed to Free Transform > Warp. This will allow you to move that half of the leaf without warping the right half. Make sure not to move the points that are in contact with the leaf that is not selected as this will cause a tear between the two pieces.

Step 12

Next, duplicate the layer with your leaf on it, drag that layer below your original leaf layer. Warp it a little to show some discrepancy. Repeat this process as many times as your desire. Play with it and have fun.

Step 13

On each layer you can add a simple drop shadow by double-clicking on the layer and checking the box labelled Drop Shadow. To give leaves even more depth, make sure you adjust the Distance, Size, and Opacity accordingly. The larger leaf has an Opacity of 63%, a Distance of 299px, and a Size of 84px (this is on an artboard sized at 2590px by 1943px at 72px per inch). If you have a leaf that is directly on top of another, you will want to have the distance significantly lower, as well as the size. It should be more sharp and distinct.

Step 14

Next I added a quick and easy Bevel and Emboss. It is often frowned upon to use this but it gets the job done quick. You can paint the sunlight hitting the leaf if you desire, but this is only an intermediate tutorial.

Double-click on the desired layer and check the box Bevel and Emboss. Change your Depth to 100%, Size to 65px, and Soften to 0px. Also you may want to lower the Opacity of the Highlight Mode as well as the Shadow Mode.

Step 15

You may want to add some depth of field. To do this I recommend you use a simple Gaussian Blur. Select the leaf that is below the rest of them. Right-click on the layer in the Layer Window and select Convert to Smart Object. Now select Filter > Blur > Gaussian Blur and set it to 2.6 pixels.

A Smart Object will allow you to change the settings of your applied filters non-destructively. If you are really thoughtful, you could do this with the Drop Shadow and the Bevel and Emboss on the leaves...repeat this process with the other leaves, but lower the blur as the leaves get closer to the largest leaf. We want that to be the focus.

You can also use the paint brush to mask the Smart Filter on the Smart Object. If you select the Smart Filter on your Smart Object layer, select the color black and paint on the artboard with the Paintbrush Tool. You will find that it removes the Gaussian Blur (or any other filter you applied to your Smart Object) in the area that you paint black. I did this with the largest leaf and left only the edges slightly blurred.

Final Image

There you have it. A quick and easy display of greenery. You can really play around with this and do a lot of different types of leaves and positioning. I hope you've enjoyed this tutorial. Half the fun is just messing around with the Warp tool. The final image is below. You can view it larger here.

How to Make Great Fireworks

This tutorial will show you how to make some really great fireworks using Photoshop. It’s a great technique to use on celebration cards and posters, as well as graphics pertaining to holidays such as New Years and Independence Day.

You may have seen this effect a few days ago in Tutorial9’s New Year’s Announcement.

Fireworks Happy New Year

In this tutorial, I’ll be demonstrating how to create this effect.

Step 1 – The Background

Go ahead and create a new document, and select the Paint Bucket Tool.

Unless you plan on tweaking your fireworks color with Color Balance Layers (or by some other means) later on, the fireworks color will largely depend on what you choose your background color to be. We want a background color that is sort of dark, but also has some color value to it. I’ll be using a dark purple (#1c1727).

Fill your background layer with your chosen color.

Background Color

Step 2 -The Burst (Stroke Paths)

If’ you’ve ever used Photoshop’s Stroke Path option before, this ought to be a cinch for you. For everyone else, we’ve got an easy guide to get you going.

Create a New Layer.

You’re going to need to select the Pen Tool from the tool bar, and in the options bar, you need to make sure that you’re working with Paths instead of Shape Layers.

Paths using the Pen Tool

If you’re new to the pen tool, you might need some time getting used to it. We’ve prepared a separate Pen Tool Basics Tutorial if you’d like to learn more about it!

On your document, left click somewhere near the center of the canvas to create a point with the pen tool.

Create a Single Point with the Pen Tool

Left click again up and to the right of this point to create a new point. This time, hold down the mouse button, and drag towards the bottom right to Curve your path.

Curved Path

This will become the path which we will use to streak a beam of light across to make the “Burst Effect”.

Select the Brush Tool. Select a Foreground Color of White. Set the Size of the brush to 3px(Hardness 100%).

Under Shape Dynamics for your brush, set up a fade of around 200px.

Set up the Brush Fade

Go back to the Pen Tool. Right Click anywhere on the Canvas, and select Stroke Path. From the Box that pops up, make sure you select the Brush as the tool. This will tell Photoshop to use that brush you just set up to stroke the path you drew with the pen tool.

Stroke Path

Stroke Path with Brush

Once you have stroked your path, hit Esc Twice to make the Path line disappear.

Stroked Path

Repeat this step several times until you have a few similar lines. Remember to always start your path from the outside going in, as the fade will begin from the first point.

Burst

Step 3 – Burst Blending Options

We need to touch up our burst effect a bit by adding some blending options to our burst layer. Right Click the Layer, and select Blending Options. Add the following Drop Shadow, and Outer Glow.

Burst Drop ShadowBurst Outer Glow

This will add a slight glowing effect to your burst streaks.

Burst with Effects

Step 4 – Ambiance Effects

Create a new Layer, and place it underneath your burst streaks layer.

Select the Brush Tool, select a default round brush (to override your earlier modifications to the brush tool), and then set the hardness to 0% and the size to somewhere around 200px. Set the Foreground Color to white. Click once to near the center of your streaks.

Set this layers Blending Mode to Overlay.

Outer Ambience

Create a new Layer above the streaks now. Using a smaller brush (50-100px, hardness still at 0%, or very soft), create a small circle at the center of the streaks again, where they all start to converge. Set this layers Blending Mode to Overlay. Repeat this a few times (you should end up with 3-4 layers).

Completed Ambience

Step 5 – Adding the Sparks

Select the Brush Tool once more, and set it up as follows (We are setting up a “Glitter”, “Sparkle”, “Fairy Dust” brush, so you may already have the idea on how to set this up).

Brush Tip ShapeBrush Shape DynamicsBrush ScatteringOther Dynamics

Now that you have your brush set up (which you may want to save for later use), Create a new Layeron top of all your previous layers, and brush in some sparks for your firework. Try to concentrate mostly around the center area, easing up on the sparks as you go outwards.

Sparks without glow

I usually like to add an Outer Glow at this point in the Blending options of this new layer. It lets me add some spark ambiance, as well as add some extra color to the firework.

Sparks with Glow

Your firework should look pretty good by now!

Final Remarks

The fireworks in this tutorial hardly aim to replicate the look of a real world firework, but from an illustration perspective, they capture the elements of fireworks in a fun, creative manner.

To go a step further, you may want to add some Color Balance layers to add some colorful effects to your fireworks. You could also play with depth of field effects to give more depth to larger scenes.

Feel free to download our Fireworks Example PSD to see how we went about doing things!

Final Fireworks Example

Tool Guide >>> Photoshop Pen Tool Guide

In this tutorial, I’m going to show you how to use the Pen tool in Photoshop to create your own custom shapes. I’ll take you through a series of exercises that will guide you through the basic, essential functions of the Pen tool.

About The Pen Tool

The pen tool is one of the few tools available to you in Photoshop that works with Vector Graphics as opposed to Raster Graphics. Vector Graphics use mathematical statements and points in order to define their shape and other characteristics, and therefore are very scalable. In other words, vector graphics can be scaled to any size without ever losing quality.

With the Pen Tool, we can create lines and curves that can be put together to create custom shapes. If we combine the pen tool with some of the other vector shapes, we can create some intricate, scalable objects (I’ll be covering additional vector tools in other tutorials).

Getting Started

In order to help familiarize yourself with the pen tool, I’m going to take you through a series of examples that will show you how to draw and create some custom shapes.

To begin, Create a New Document (I’m using 284×284 in my example, with default Photoshop Preferences).

Next, let’s enable the Grid. Go to View > Show > Grid, or Ctrl + ‘. Also Enable Snap (View > Snap, or “Shift + Ctrl + ;“).

Enable the Grid

We enable grid + snapping so that when we draw using the pen tool, we can easily make precise shapes, and curves with little effort.

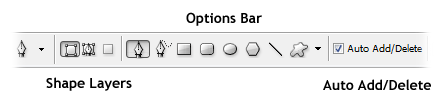
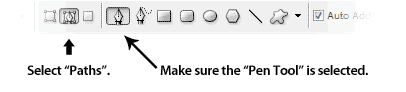
Now select your Pen Tool from the toolbar, and set it up to work on Shape Layers in the Options Bar.

Pen Options (Shape Layers, Auto Add/Delete)

Select a foreground color of your choice.

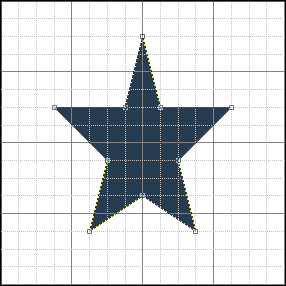
Drawing with the pen tool is easy. Simply position your cursor where you’d like to begin drawing, andclick to create your first anchor point. Subsequent anchor points will all be connected to the last point drawn, allowing you to create custom shapes. To complete a shape, click the first anchor point.

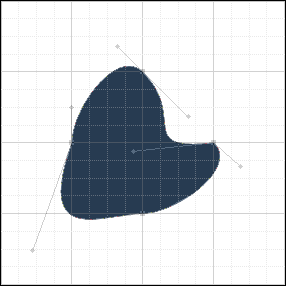
Go ahead an try it. See what you can create using basic anchor points. I managed to make a very primitive star.

Custom Star Shape with Pen Tool

That’s simple enough, right?

Drawing Curves with the Pen Tool

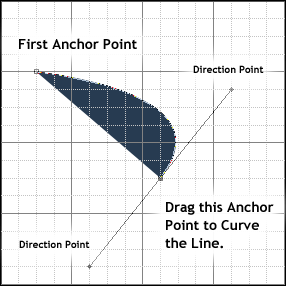
You may have already noticed that something interesting when drawing curves, and dragging after clicking to create an anchor point. The lines begin to curve!

Go ahead and try it. After creating an anchor point, hold down the mouse button and drag in thedirection you want your line to curve.

Creating Curves with the Pen Tool

If you follow the below layout, you should be able to create a primitive circle shape.

Primitive Circle Shape with Pen Tool

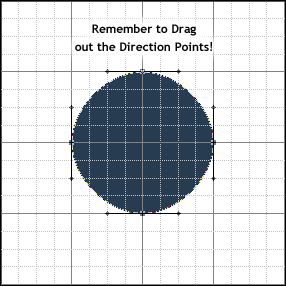
If you’re still having trouble, here’s a video that illustrates how to create the circle. When you see the icon change into a black pointer, that means that I’m DRAGGING once I create a point.

The curves characteristics are based on the length of these direction points, and at what angle they are drawn at. After some time practicing with them, you should become more familiar with drawing more complex curves. It should also be noted that you can change any directional points with the pen tool byholding Ctrl, or Ctrl + Alt.

Example:

Example of customizing directional points

Example Shapes

Let’s take what we’ve learned so far, and apply it in some basic design. If you’re using the same sized document as I am (with default Photoshop grid preferences), you should be able to Copy + Paste these templates in your document, and follow my anchor points easily.

First let’s make a Rounded Rectangle. We already have a custom shape that does this, but sometimes designs call for modified rounded boxes of sorts.

Rounded Rectangle Template

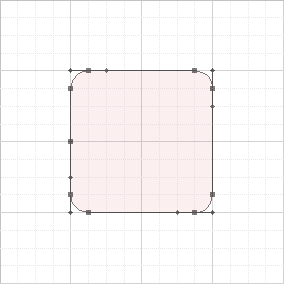
The Rounded Rectangle Shape uses basic curves, and is very simple to create. With some slight modifications, we can make rectangles with only 1, 2, or 3 of the corners rounded, while keeping the rest sharp corners.

Here is another template that focuses on “S” shaped curves, as seen in frequency waves.

Waves Template

“S” curves are used all the time in more complex shapes. They are created by dragging the Directional Points of two sibling anchor points in the same direction.

For our last example, let’s make a “Pen Tool” custom shape!

Pen Tool Custom Shape Template

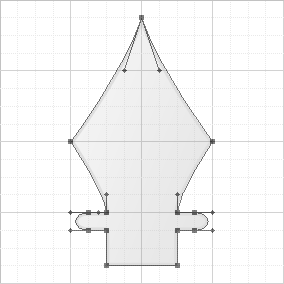
Creating an exact copy of this shape will require you to have some knowledge of the “Convert Point Tool” as well. Once your points are made, go back with the Convert Point Tool, click a point, then click and drag out the point so that you can manually modify the direction handles for custom curves. See how easy it really is? With a little practice and imagination, you can literally design anything you wish with the pen tool.

Conclusion

The Pen Tool provides a very simple way to work on custom shapes and paths inside of Adobe Photoshop, and allows users to easily create scalable objects. There are limitations to what can be done in Photoshop in terms of vector graphics, but that’s what we have Adobe Illustrator for!

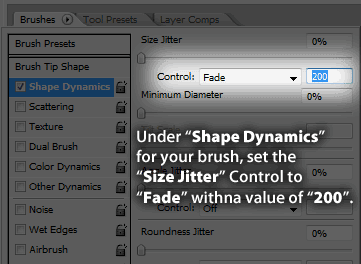
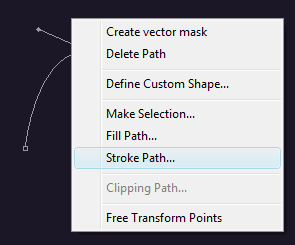
If you create a custom shape that you’d like to use later, you may decide to save it as a custom shape. To do this, right click the shape with the Pen Tool, and select Define Custom Shape. Remember, custom shapes can be changed to any size and NEVER LOSE QUALITY!

It only seems fitting to end this passage with a quote by Edward Bulwer-Lytton, “The pen is mightier than the sword.” In this case, I’d compare the sword to an ordinary brush used in Photoshop. However, each serves its place in Graphic Design, so it’s up to you as the designer to decide where to utilize each respectively!

The Pen is Mightier than the Brush!